PEMA investigating metabarcoding
Basics for running PEMA
Step 1: Prepare for running PEMA
Let us call the directory about to mount into the PEMA container my_analysis.
PEMA needs two madatory input entries that must be included in the my_analysis directory:
-
a
mydatafolder including only the paired-end.fastq.gzfiles. If there is any irrelevant file there you need to remove it otherwise PEMA will return an error. :sos: Please see below about how your filenames need to be. -
the
parameters.tsvfile
Optionally, you might also include:
- a
metadata.csvfile - a
phyloseq_in_PEMA.Rscript - a
custom_ref_dbfolder
according to the needs of your analysis.
The mydata directory
The name of this file needs to be always as shown! Otherwise, PEMA will return you an error.
You need to provide paired-end .fastq.gz files. Notice that your files need to be compressed.
It is essential for PEMA to keep the names of the aforementioned folders and files exactly as they are.
Furthermore, your files need to follow a certain format; the ENA format.
What does that mean to you?
In the parameters.tsv file (see below for more) there is an option called EnaData.
If your samples are already in the ENA database and you are using sequence files from there you might set this parameter to Yes and you are ready to go.
In this case, your data files will look something like this:
ERR654526_1.fastq.gzERR654526_2.fastq.gz
Otherwise, you need to make sure that the filenames of your sequence files have the exact following suffixes:
- forward read:
_R1_001.fastq.gz - reverese reads:
_R2_001.fastq.gz
On top of that, please avoid any special characters on your filenames such as -, @, $, # etc.
Preferably, use only underscores (_).
Then, you need to set the EnaData parameter to No and PEMA will make a convertion to your files and it will return a directory called initial_data with your own data and
a mapping_files_for_PEMA.tsv with the new names of the files PEMA built and their corresponding names from your data.
Not followng these rules for your filenames, PEMA will fail.
The parameters.tsv file
Like in the case of the mydata folder, the parameters.tsv file needs to always keep its name like that.
This file is rather important as it allows you to ask for PEMA exactly what you need. You may run several runs to tune the parameters included there to get the best results possible.
In each PEMA version it is quite possible that new parameters have been added so a good practice is to always get the corresponding parameters.tsv file from the PEMA GitHub repo.
As there is a great number of parameters you will be asked to fill, it is always a good practice to check on the documentation of each algorithm you are about to choose. Links to these documentation pages can be found in the parameters.tsv file.
For further infromation regarding each marker gene, you may have a look on the corresponding documentation files.
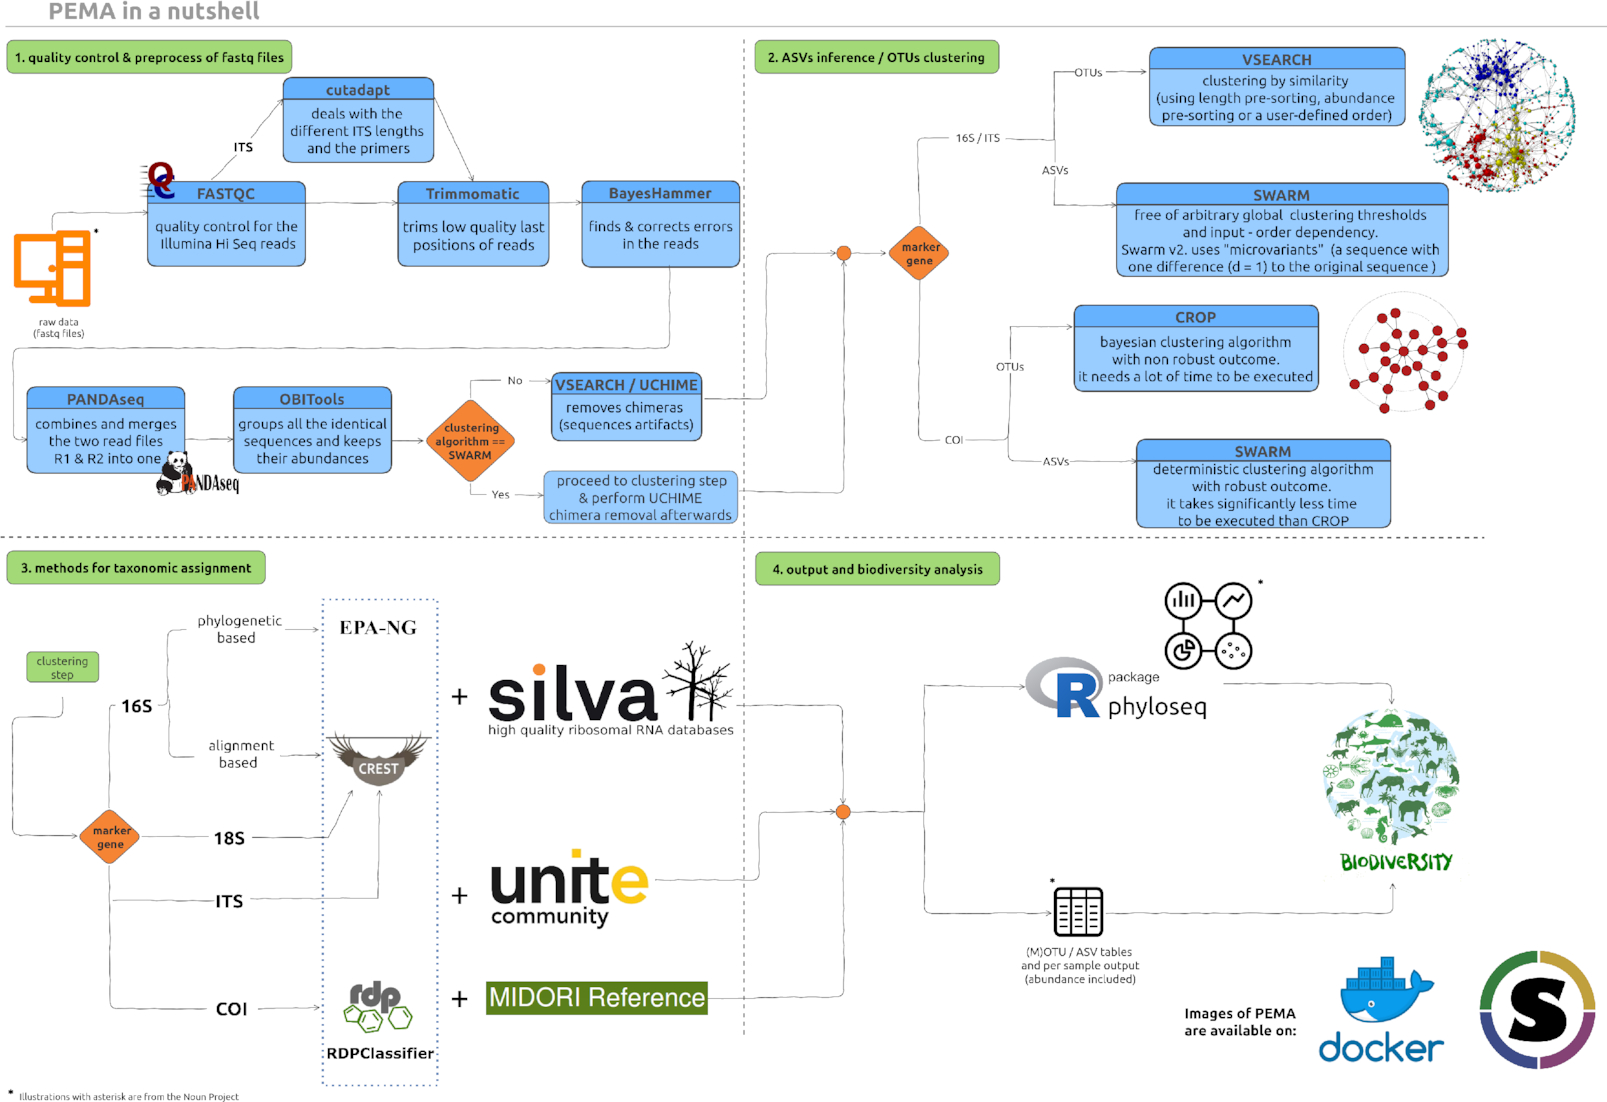
Here is an overview of the PEMA modules.
The phyloseq_in_PEMA.R script
This scirpt is an optional input file for the case that you want to run any analyses after getting the final table with the taxonomy assigned sequences and their relative abundance in each sample.
You may find this script on the PEMA GitHub repository however, as you will notice, this script has several sections.
Section 0 and section 1 need to be always as in the script on the repo.
However, you may change the rest sections as suit you best!
In the script we provide we have included some basics analyses, however you need to remember that some of those are strongly related to the metadata.csv file (see below), so you will have to change these parts accordingly.
You may remove analyses or add any other feauture from the phyloseq package you would like to. You may have a look on the features of phyloseq over here or find any similar tutorial on Google.
The metadata.csv file
Like in all previous cases, this file needs to be always called like that. You may find such a file on the PEMA GitHub repo as a prototype to build your own.
You may provide as much metadata as you need for the phyloseq analysis part.
The custom_ref_db folder
Since v.2.0.1 PEMA supports taxonomy assignment based on custom referernce databases.
This module, can be quite grumpy so you may check the Training the CREST classifier if you are using 16/18S rRNA or ITS data and Training the RDPClassifier for the COI acase, tabs to guide you through this task.
Like in all aforementioned input files or/and directories, you always have to call this directory exactly as mentioned above.
The names of the files you provide inside the custom_ref_db folder may be anything as long as they have the required suffixes, i.e .fasta and .tsv for the case of the RDPClassifier and .fasta and .nds for the CREST algorithm.
Step 2: Running PEMA
Once your analysis_directory is ready, you may proceed on running PEMA. Actually, you have already done your part and now it’s just a single command or a simple submission script if you’re working on a HPC environment (see for more on PEMA on HPC).
In any case, running PEMA is a single command, depending on the virtualization platform you are using, exactly like the downloading task.
So, you just need to mount your analysis_directory and then ask PEMA to run.
Docker
You just need to replace the <path_to_your> with the path where you analysis_directory is located and the <tag> with the PEMA version you are using.
docker run \
--rm \
-it \
-v /<path_to_your>/analysis_directory/:/mnt/analysis
hariszaf/pema:<tag>
Singularity
Like in the Docker version, you need to replace the <path_to_your> part with the path where you analysis_directory is located and the <tag> accordingly.
singularity run \
-B /<path_to_your>/analysis_directory/:/mnt/analysis \
/<path_to>/pema_v.1.3.2.sif
Take advantage of the checkpoints!
As you may need to partially re-run your analysis, PEMA supports that thanks to checkpoints built after each step. Checkpoints are also made in case an error occurs.
To run a checkpoint, assuming by changing your taxonomy assignment parameters, you just need to run
docker exec \
-v /<path_to_your>/analysis_directory/:/mnt/analysis \
/home/tools/BDS/.bds/bds -r /mnt/analysis/taxonomyAssignment.chp
or
singularity exec \
-B /<path_of_your>/analysis_directory:/mnt/analysis pema_v.1.3.1.sif \
/home/tools/BDS/.bds/bds -r /mnt/analysis/taxonomyAssignment.chp